
HOA-Friendly Decks: Get to “Yes” the First Time
HOA rules don’t have to be confusing. Most boards want safe builds, neat designs, and documents that are easy to read. With the right plan and a clear submittal, you can move from idea to approval without headaches. Here’s how to make your deck an easy “yes.”
Know Your HOA’s Rules Up Front
Start by finding the exact guidelines for decks, railings, colors, and placement. Look for any limits on height, privacy screens, lighting, and skirting.
Request the packet: Get the latest architectural rules, application form, and sample drawings so you submit what the board expects.
Spot red flags early: Property-line setbacks, easements, and view corridors can shape size and location—measure before you sketch.
Check timelines: Many HOAs meet monthly. Submitting a complete package before the cut-off can save weeks.
Prepare a Clean Submittal Package
Boards approve faster when your plans are tidy and complete. Make it easy to say yes.
Site plan that tells the story: Show the house outline, lot lines, setbacks, and deck footprint with clear dimensions and labels.
Build details in plain English: List joist size/spacing, beam spans, footing depth, stair rise/run, railing style, and finish color—all on one sheet if possible.
Photos & samples help: A quick photo of the back elevation and a small material sample or brochure help the committee visualize the result.
A skilled deck builder can turn your ideas into code-ready drawings that match HOA expectations and keep questions to a minimum.
Design Choices HOAs Approve
Simple, coordinated designs pass more easily than complex ones. Aim for clean lines and colors that match the home.
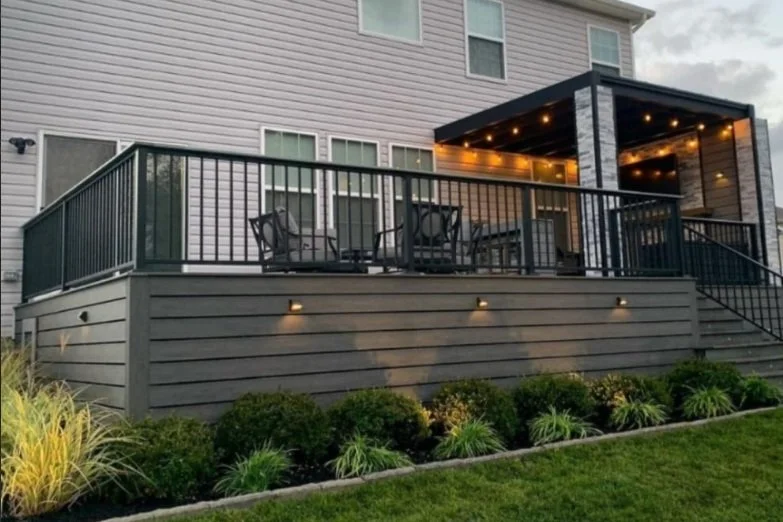
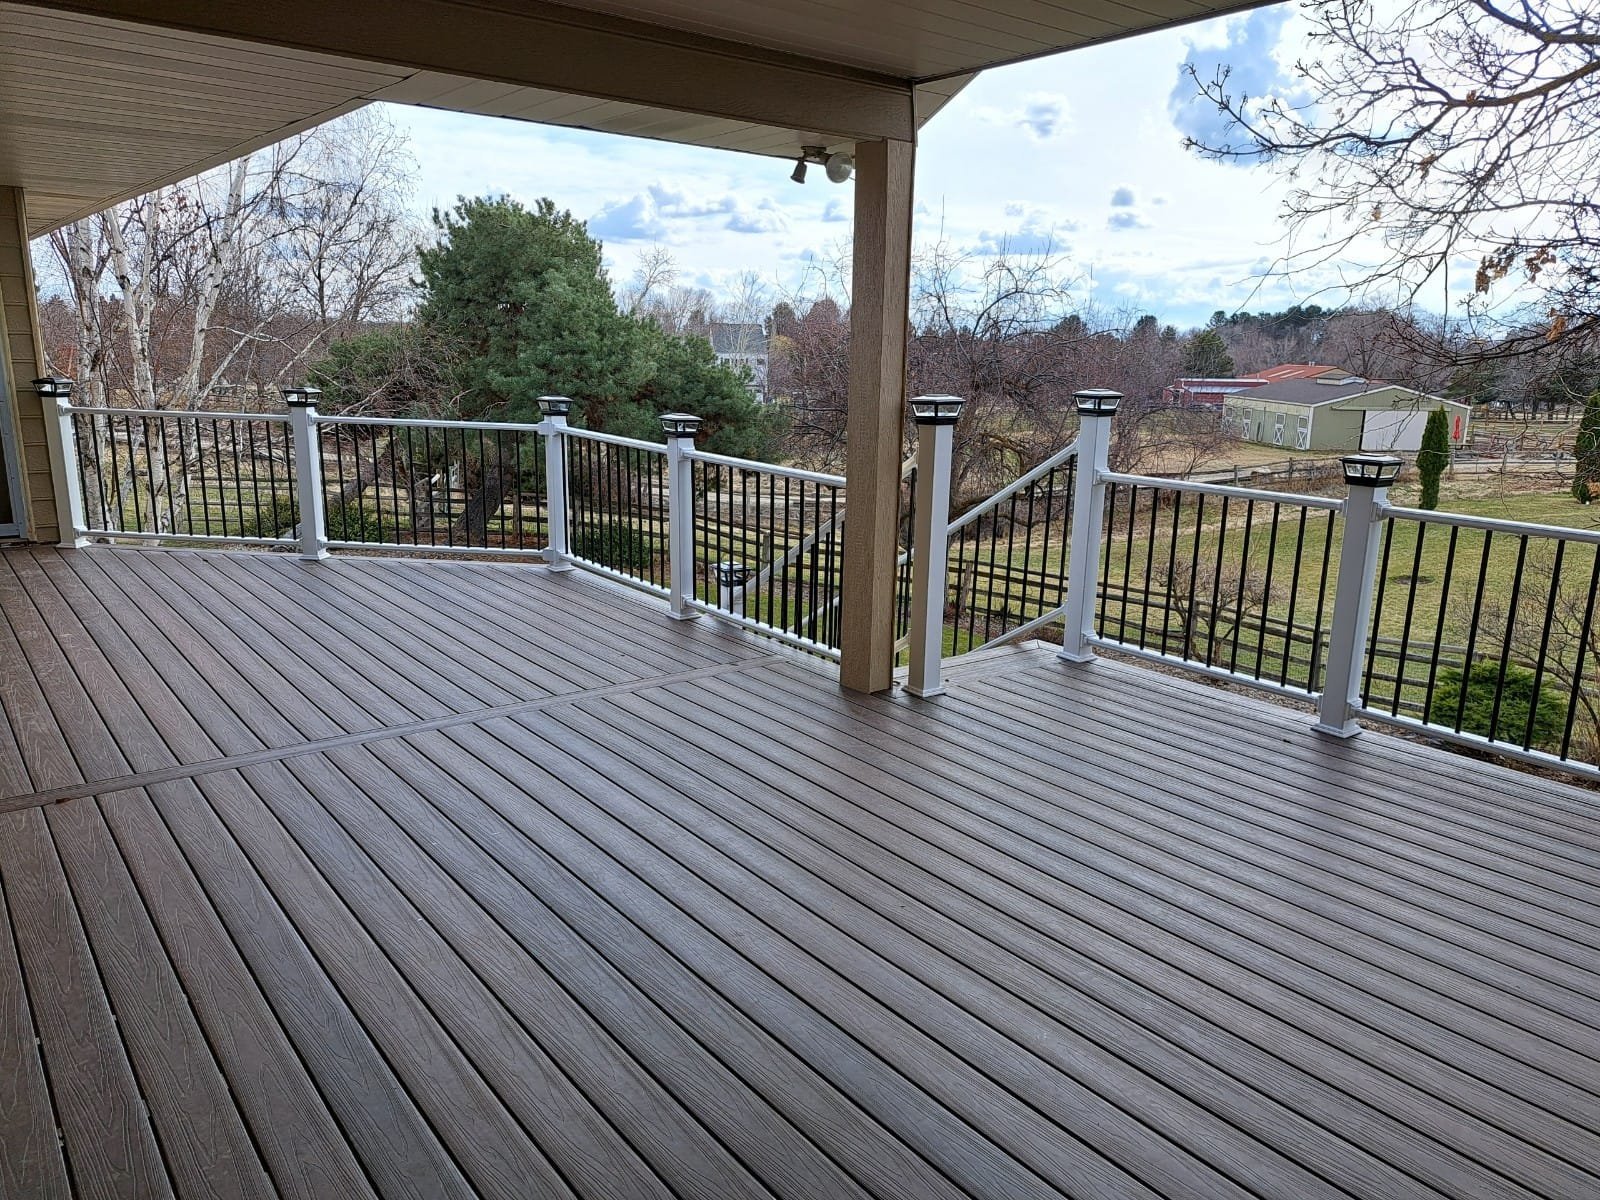
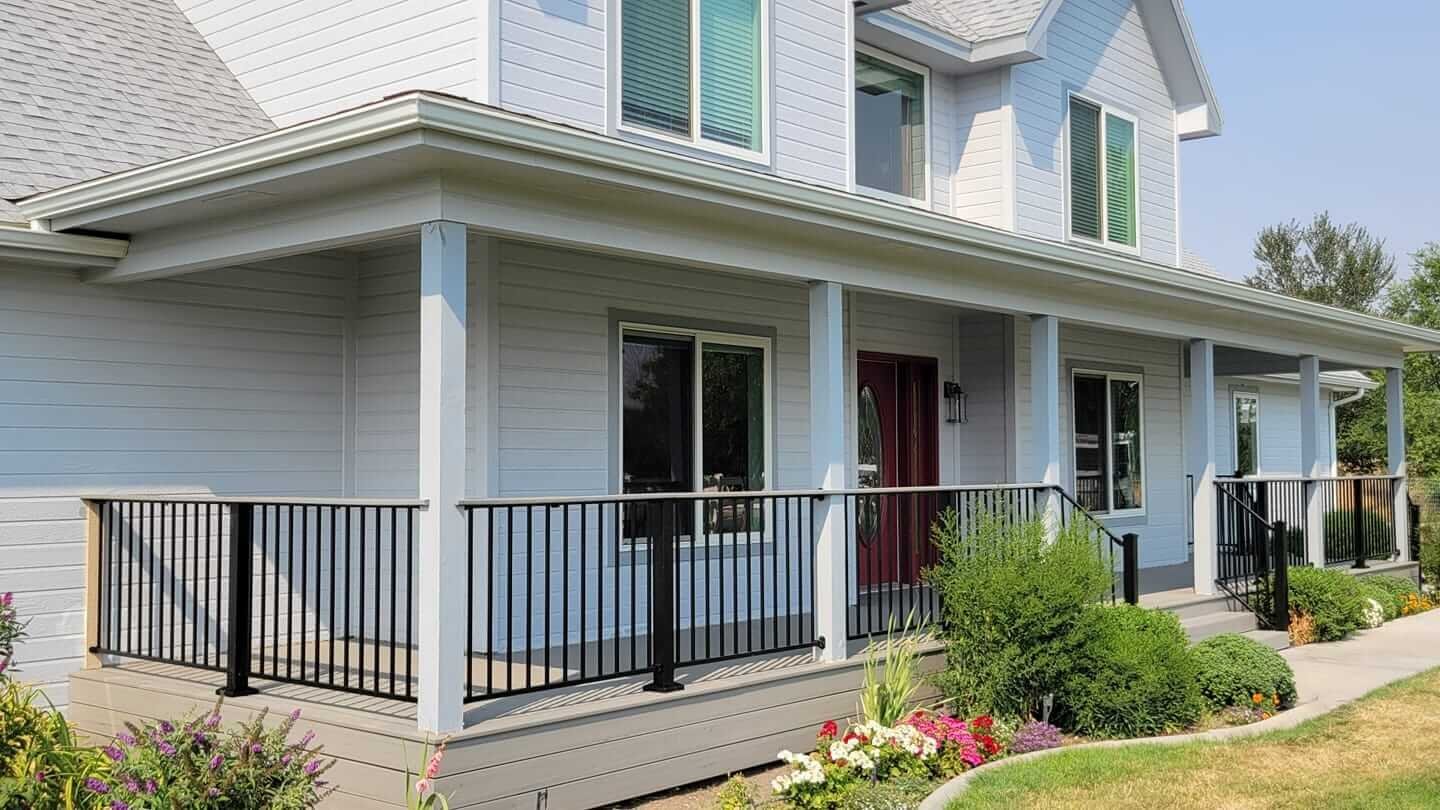
Match the palette: Choose board, rail, and post colors that tie into the siding, trim, or roof. Neutral, mid-tone options read “finished” without shouting.
Keep views open: Where sightlines matter, consider slim black balusters or a glass/cable section on the view side while keeping standard pickets elsewhere for budget control.
Hide the underside smartly: Ventilated skirting or lattice that matches trim color looks clean and protects framing, which many HOAs prefer.
When homeowners ask how to get HOA approval for a new deck, the short answer is: match the home, keep forms simple, and label everything.
Communication and Follow-Through
Clear communication moves applications forward and cuts down on resubmittals.
One point of contact: Use the name on the application for all emails so the committee can track updates.
Answer fast: If the board requests a minor change—color note, rail height, or stair detail—reply within 24 hours and highlight the revision on the plan.
Coordinate inspections: After HOA approval, city permits still apply. Partnering with deck builders Meridian ID aligns board approvals with permit timing so the schedule stays tight.
Working with a deck builder also helps you prep for the final HOA walk-around, ensuring what was approved matches what was built.
Conclusion
HOA approvals are easier when your plans are clear, your colors match the home, and your follow-through is quick. Want a smooth, first-try “yes”? Call Sunset Decks Idaho at (208) 739-6778—we’ll help you submit a clean package, earn approval, and get your deck ready to enjoy.

Winter-Proof Your Deck: Materials & Details That Stand Up to Cold
Winter can be rough on outdoor spaces—boards absorb moisture, hardware corrodes, and slick steps make evenings risky. The fix isn’t complicated: choose cold-ready materials and add a few smart details before the first freeze. Here’s how to prep a deck that stays safe, looks sharp, and bounces back fast when spring returns.
Choose Boards Built for Winter
Start with surfaces that handle moisture and temperature swings without warping or splintering. Composite and PVC boards shine here, while quality wood can work with diligent sealing and upkeep.
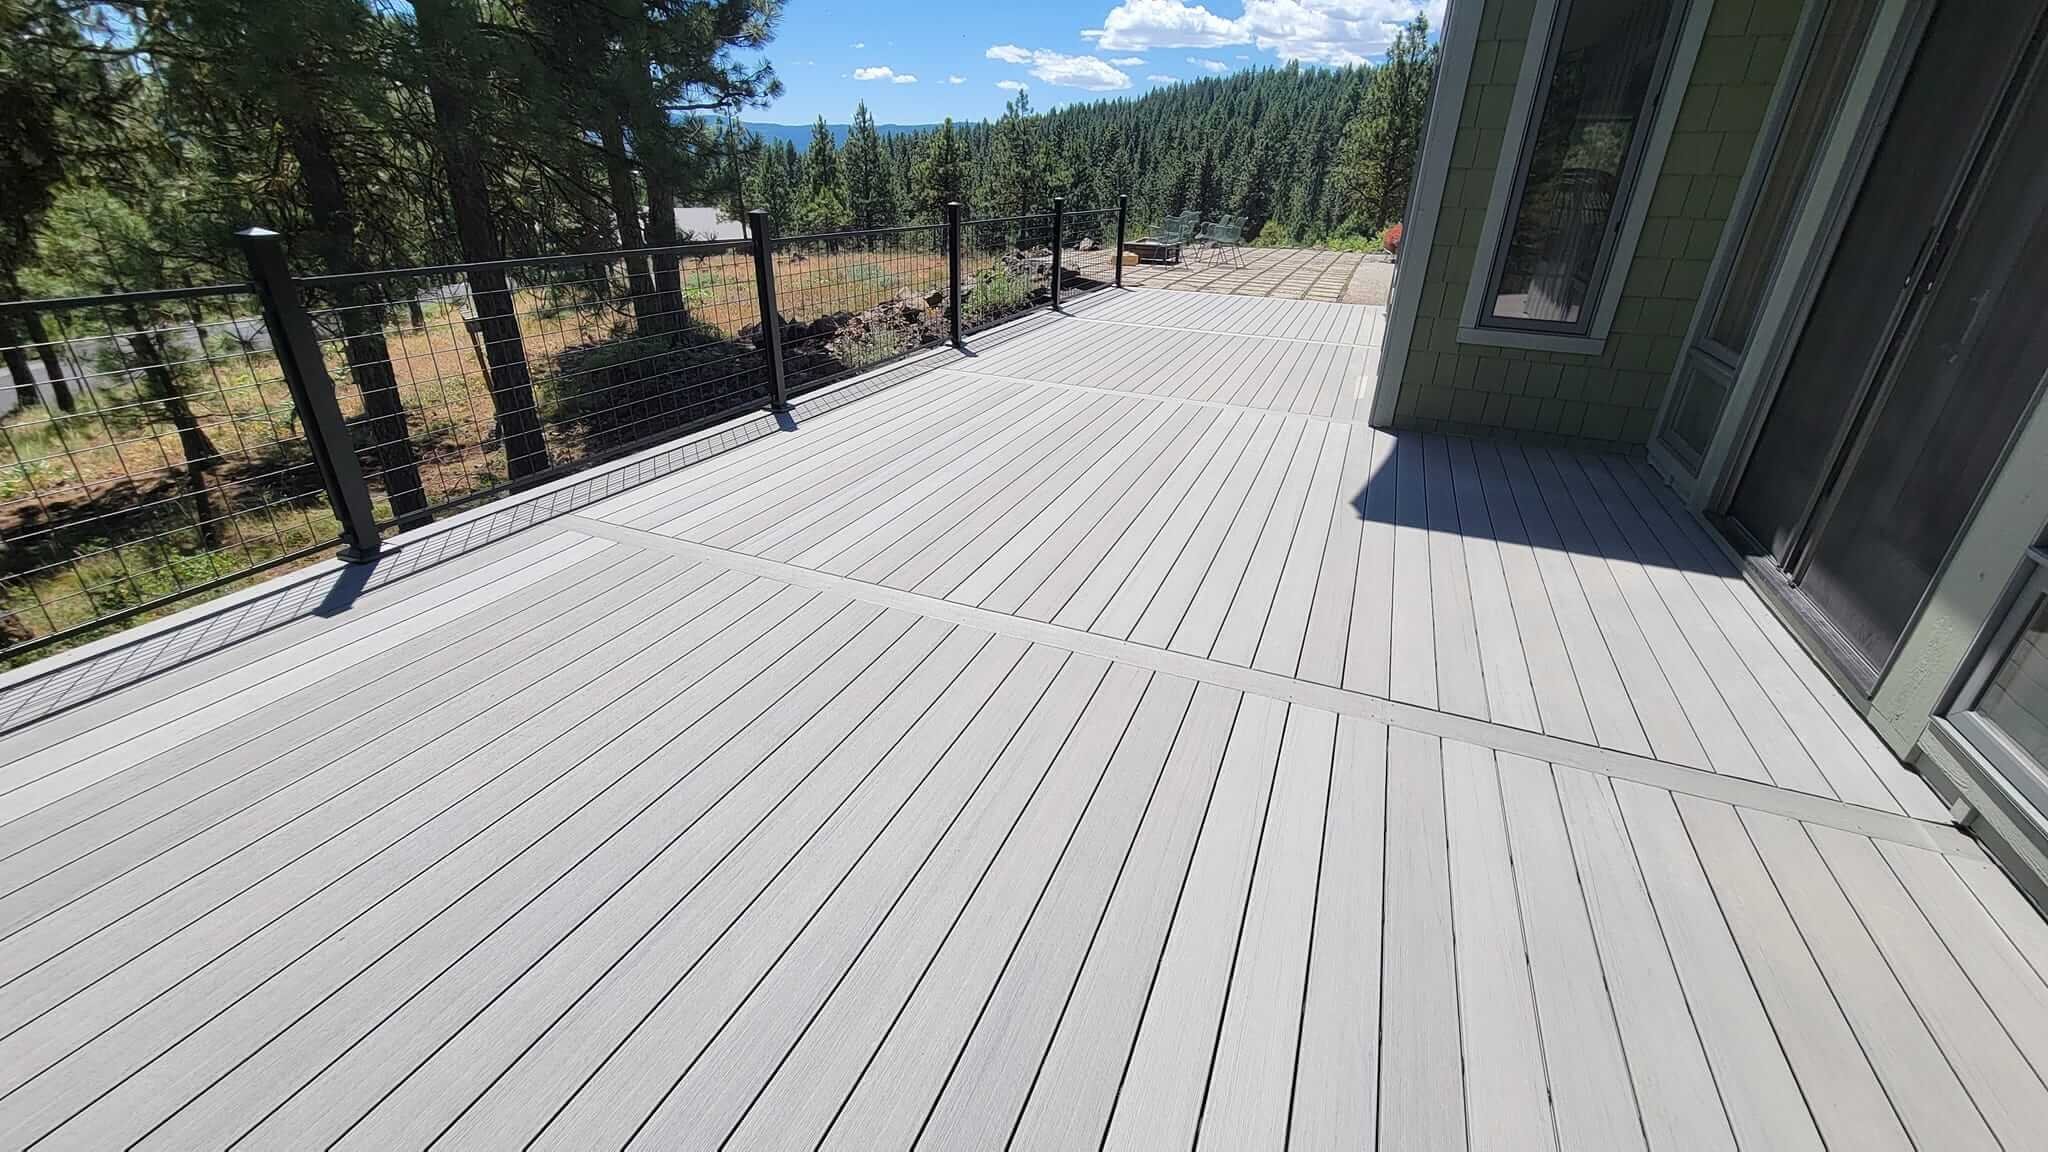
Moisture resistance: Capped composite or PVC sheds meltwater and resists swelling, which helps prevent cupping, edge lift, and noisy joints.
Color & heat: Mid-tone colors stay more comfortable in winter sun and hide grime better than very light boards; dark tones can feel warmer but show salt lines.
End protection: Seal cut ends (or use factory end caps) so water can’t wick into the core—the spot most likely to start damage.
Hardware, Framing & Movement
Cold contracts materials; spring expands them. Build in room to move and pick hardware that laughs at slush and salt.
Corrosion defense: Stainless or hot-dipped galvanized fasteners and brackets avoid rust streaks and stuck screws when you need spring touch-ups.
Proper gapping: Follow maker specs so boards can expand/contract without buckling. A knowledgeable deck builder will set gaps suited to the product and climate.
Ledger & flashing: Solid flashing at the house and correctly fastened ledgers keep meltwater out of the structure—huge for long-term health.
Traction, Drainage & Snow Strategy
Winter safety starts with grip and clear water paths. A few tweaks reduce slips and stop ice from camping out on your boards.
Textured surfaces: Pick a winter-friendly texture, and add gritty stair nosings in high-traffic zones for extra bite on thaw/refreeze days.
Water paths: Pitch surfaces slightly and keep board gaps clean so meltwater drains instead of refreezing. Your deck builder can add discreet drip edges to protect fascia.
Snow tools: Use a plastic shovel and push with board's direction to avoid catching the edges. Skip rock salt—choose pet-safe, deck-safe melt products.
Simple Winter Care Plan
A short checklist keeps your deck calm through the cold months—and makes spring cleanup easy.
Pre-season check: Tighten rails and post caps, clear debris from gaps, and touch up sealant lines before the first deep freeze.
Mid-winter sweeps: After storms, brush off stairs and main walkways to stop packed ice from forming.
Spring reset: Rinse the deck, inspect hardware, and re-seal wood surfaces so you’re ready for patio season again. Professional teams of deck builders Meridian ID understand local freeze–thaw patterns and can recommend products that hold up here.
Conclusion
Winter doesn’t have to be hard on your deck. With cold-ready boards, rust-resistant hardware, smart drainage, and a light care routine, your space stays safe and stylish all season. Ready to prep for the cold? Call Sunset Decks Idaho at (208) 739-6778—let’s winter-proof it the smart way!
Curb Appeal Boosters for Your Deck (Without Blowing the Budget)
A good deck should look great from the street and feel even better up close. You don’t have to start from scratch to make a big change—small, smart upgrades can refresh the whole space.
Below are simple ideas we use on real projects to add style, comfort, and long-term value. If you’re comparing options, search for budget-friendly deck upgrades that boost curb appeal and you’ll see why these choices work.
Start with What People See First
Your deck’s “first impression” starts at the edges and steps. Focus here and the whole space looks new.
Fascia & picture-frame borders: A clean border board around the perimeter hides cut ends and gives a finished, custom look. It’s a small material add that makes a big visual difference.
Stair refresh: Uniform treads, crisp risers, and closed stringers look polished from the sidewalk. If stairs feel bouncy, we add support—safe steps always read as “quality.”
Skirting that breathes: Lattice or solid panels with vent gaps hide the underside, keep critters out, and let air flow so framing lasts longer.
Railings that Look Premium for Less
Rails are eye level, so upgrades show immediately—but they don’t have to be pricey.
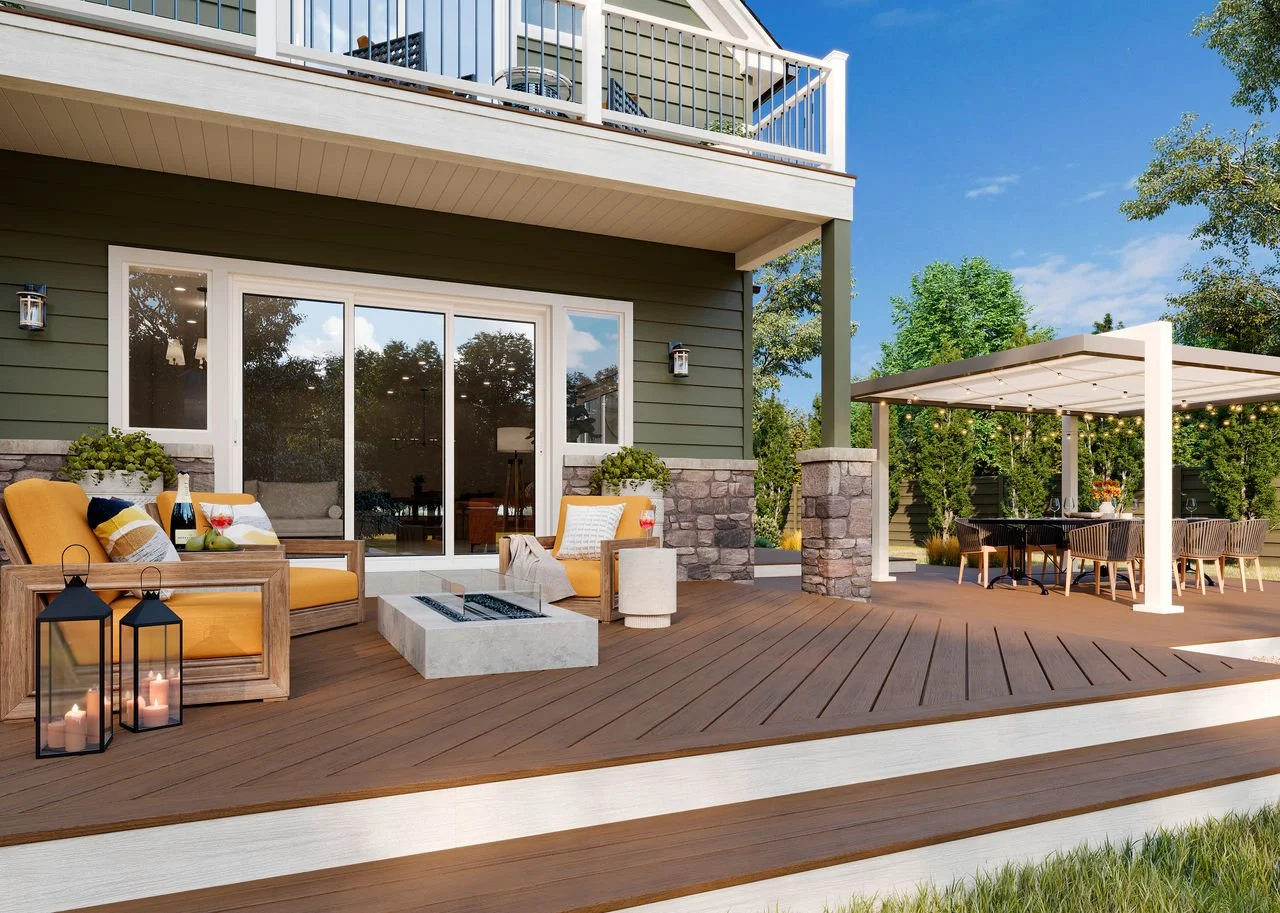
Mix materials wisely: Pair composite top rails with black aluminum balusters. The combo feels modern, reduces maintenance, and keeps costs lower than full composite systems.
Post caps & sleeves: Updated caps, sleeves, and bases hide old wear, protect posts from water, and create a tidy, uniform line across the deck.
Clear views where it counts: On the best view side, swap a section to cable or glass to open the sightline. Keeping the rest in standard pickets controls the budget while delivering a “wow.”
Lighting That Works Night and Day
Great lighting adds safety and drama after dark—and looks sleek in daylight, too.
Under-rail glow: Low-profile LED strips tucked beneath the top rail wash light down the balusters. It feels high-end, uses very little power, and avoids glare.
Step and post lights: Small, downward-facing fixtures on risers and newels guide the way, reduce trips, and highlight your deck’s geometry from the curb.
Smart controls: Timers or photocell switches turn lights on automatically at dusk. Simple tech, big convenience, and almost no energy waste.
Smart Finishes and Little Details
Finishes protect the deck and pull the whole design together. The right touches last longer and clean easier.
Color that hides wear: Mid-tone boards and rails mask dust, footprints, and pollen better than very light or very dark shades—less cleanup, longer “fresh” look.
Hardware that won’t rust: Stainless or hot-dipped galvanized screws and brackets stop streaks on fascia and posts. Hidden fasteners on flat areas keep surfaces smooth.
Seal the story: If you’re keeping wood, a quality stain and proper prep (clean, dry, then coat) pays off in color depth and longer life. A knowledgeable deck builder can recommend low-odor, low-VOC options that last.
Conclusion
Small upgrades add up to a big refresh—clean borders, sharper rails, smarter lighting, and durable finishes. Want help choosing the best mix for your home and budget? Partnering with deck builders Meridian ID keeps choices simple, while an experienced deck builder handles the details that make it look custom.
Call Sunset Decks Idaho at (208) 739-6778 and let’s give your deck curb appeal that stands out!

Your Permit Roadmap: The Fast Way to Get a Deck Approved
Permits are the part of a deck project that often slow things down—but they don’t have to. With clear drawings, code-ready details, and fast replies, the city can say “yes” much sooner. Think of it like a checklist: show where the deck goes, prove it’s strong and safe, and answer questions quickly.
This guide breaks the process into simple steps you can follow. You’ll see what to prepare, how to submit, and how to avoid common mistakes. Do these basics well, and permitting turns from a headache into a quick green light.
When a Permit Is Required
Most projects need a permit if the deck is attached to the home, raised above a set height, or includes stairs and guardrails. The city also checks setbacks and utility easements, so show those on your plan.
If you add lighting or a gas stub for a grill, expect extra trade reviews. Confirm thresholds with the local office and review HOA rules early so colors, placement, and materials match community standards. A little homework up front prevents redraws and keeps your timeline tight.
Attached or elevated decks typically trigger permits and inspections.
Show distances to property lines and any easements.
Gather HOA approvals before you submit to the city.
What to Submit with Your Application
Strong packages get faster yeses because reviewers don’t have to guess. Include a simple site plan with your house outline, property lines, setbacks, and the deck footprint with clear dimensions.
Add framing details (joist size/spacing), beam spans, footing depth, stair/rail notes, and the exact hardware you’ll use. Product sheets for decking, connectors, and rail systems help confirm ratings.
If drawings feel tricky, a licensed deck builder can produce code-ready, easy-to-read plans that cut down on back-and-forth.
Site plan: footprint, setbacks, and measurements labeled neatly.
Build details: joists, beams, posts, footings, stairs, and rails.
Product info: spec sheets for decking, fasteners, and rail kits.
How to Speed Up Review
Homeowners often ask how to move faster. The answer is clean paperwork and same-day replies. Use the city’s checklist, match their labels, and double-check snow load, footing depth, guard height, and stair rise/run before you submit.
If comments arrive, resubmit marked revisions immediately and note the changes. Order materials while plans are in review so deliveries align with your start date.
In short, how to get a deck permit approved fast in Meridian comes down to preparation, accuracy, and quick follow-through. Working with experienced deck builders Meridian ID definitely helps because we know local expectations and common corrections.
Mirror the city’s page order and naming.
Pre-verify spans and hardware with manufacturer tables.
Reply to corrections within 24 hours to hold your place.
Inspections and Final Steps
Plan for a footing inspection before concrete and a final inspection after rails and stairs are complete. Keep stamped plans on site and leave key hardware visible.
Most delays come from shallow footings, unflashed ledgers, missing connectors, or loose rail posts. A responsive deck builder will pre-check these items, schedule inspections early, and handle small touch-ups on the spot.
After approval, review simple care tips for cleaning, snow removal, and seasonal checks to keep your new deck in great shape.
Footings: dig to the required depth; set forms square and clean.
Framing: use listed hangers and fasteners; flash the ledger.
Rails/Stairs: verify height, spacing, and solid post blocking.
Conclusion
Permits don’t have to slow you down. With complete plans, fast responses, and smart prep, approval can be quick and stress-free. Ready to move from plan to build? Call Sunset Decks Idaho at (208) 739-6778—let’s submit cleanly, pass inspections, and get you enjoying your new deck sooner!

From Idea to Backyard Ready: Your Deck Timeline Explained
Homeowners often ask, “How long does it take to build a deck?” Actually, the timeline isn’t one-size-fits-all—it’s shaped by design choices, permits, weather, and inspections.
The good news: with a clear plan, most straightforward projects move quickly and stay predictable. Below is a simple, step-by-step timeline so you know what happens first, what can add time, and how to keep things on track.
Design & Estimate (About 1 Week)
Dial in how you’ll use the space, measure the yard, pick materials, and set a realistic budget. A clean sketch and itemized estimate prevent surprises and speed vendor quotes.
Add-ons like lighting, privacy screens, or a grill zone should be chosen now so lead times don’t slip later. Talk through safety needs (rail height, stair placement) and maintenance preferences to narrow material choices.
Decide early: size, stair count, railing style, and any lighting runs.
Confirm materials: composite/PVC/wood, color family, and matching fascia.
Lean on a pro: an experienced deck builder spots code or drainage issues before they slow you down.
Permits & Ordering (2–4 Weeks)
Most decks need a permit; simple rectangles clear faster than multi-level or covered designs. While plans are reviewed, order materials so delivery meets your start date.
Submitting complete, readable drawings keeps you out of the correction cycle, and marking revisions clearly speeds rechecks. Have HOA approvals ready if required, so processes don’t overlap.
Review pace: 10–15 business days is common; busy seasons may add a few.
Special orders: rails, custom colors, or lighting kits can add days—choose early.
Local know-how: working with licensed deck builders Boise ID helps align permits, approvals, and deliveries.
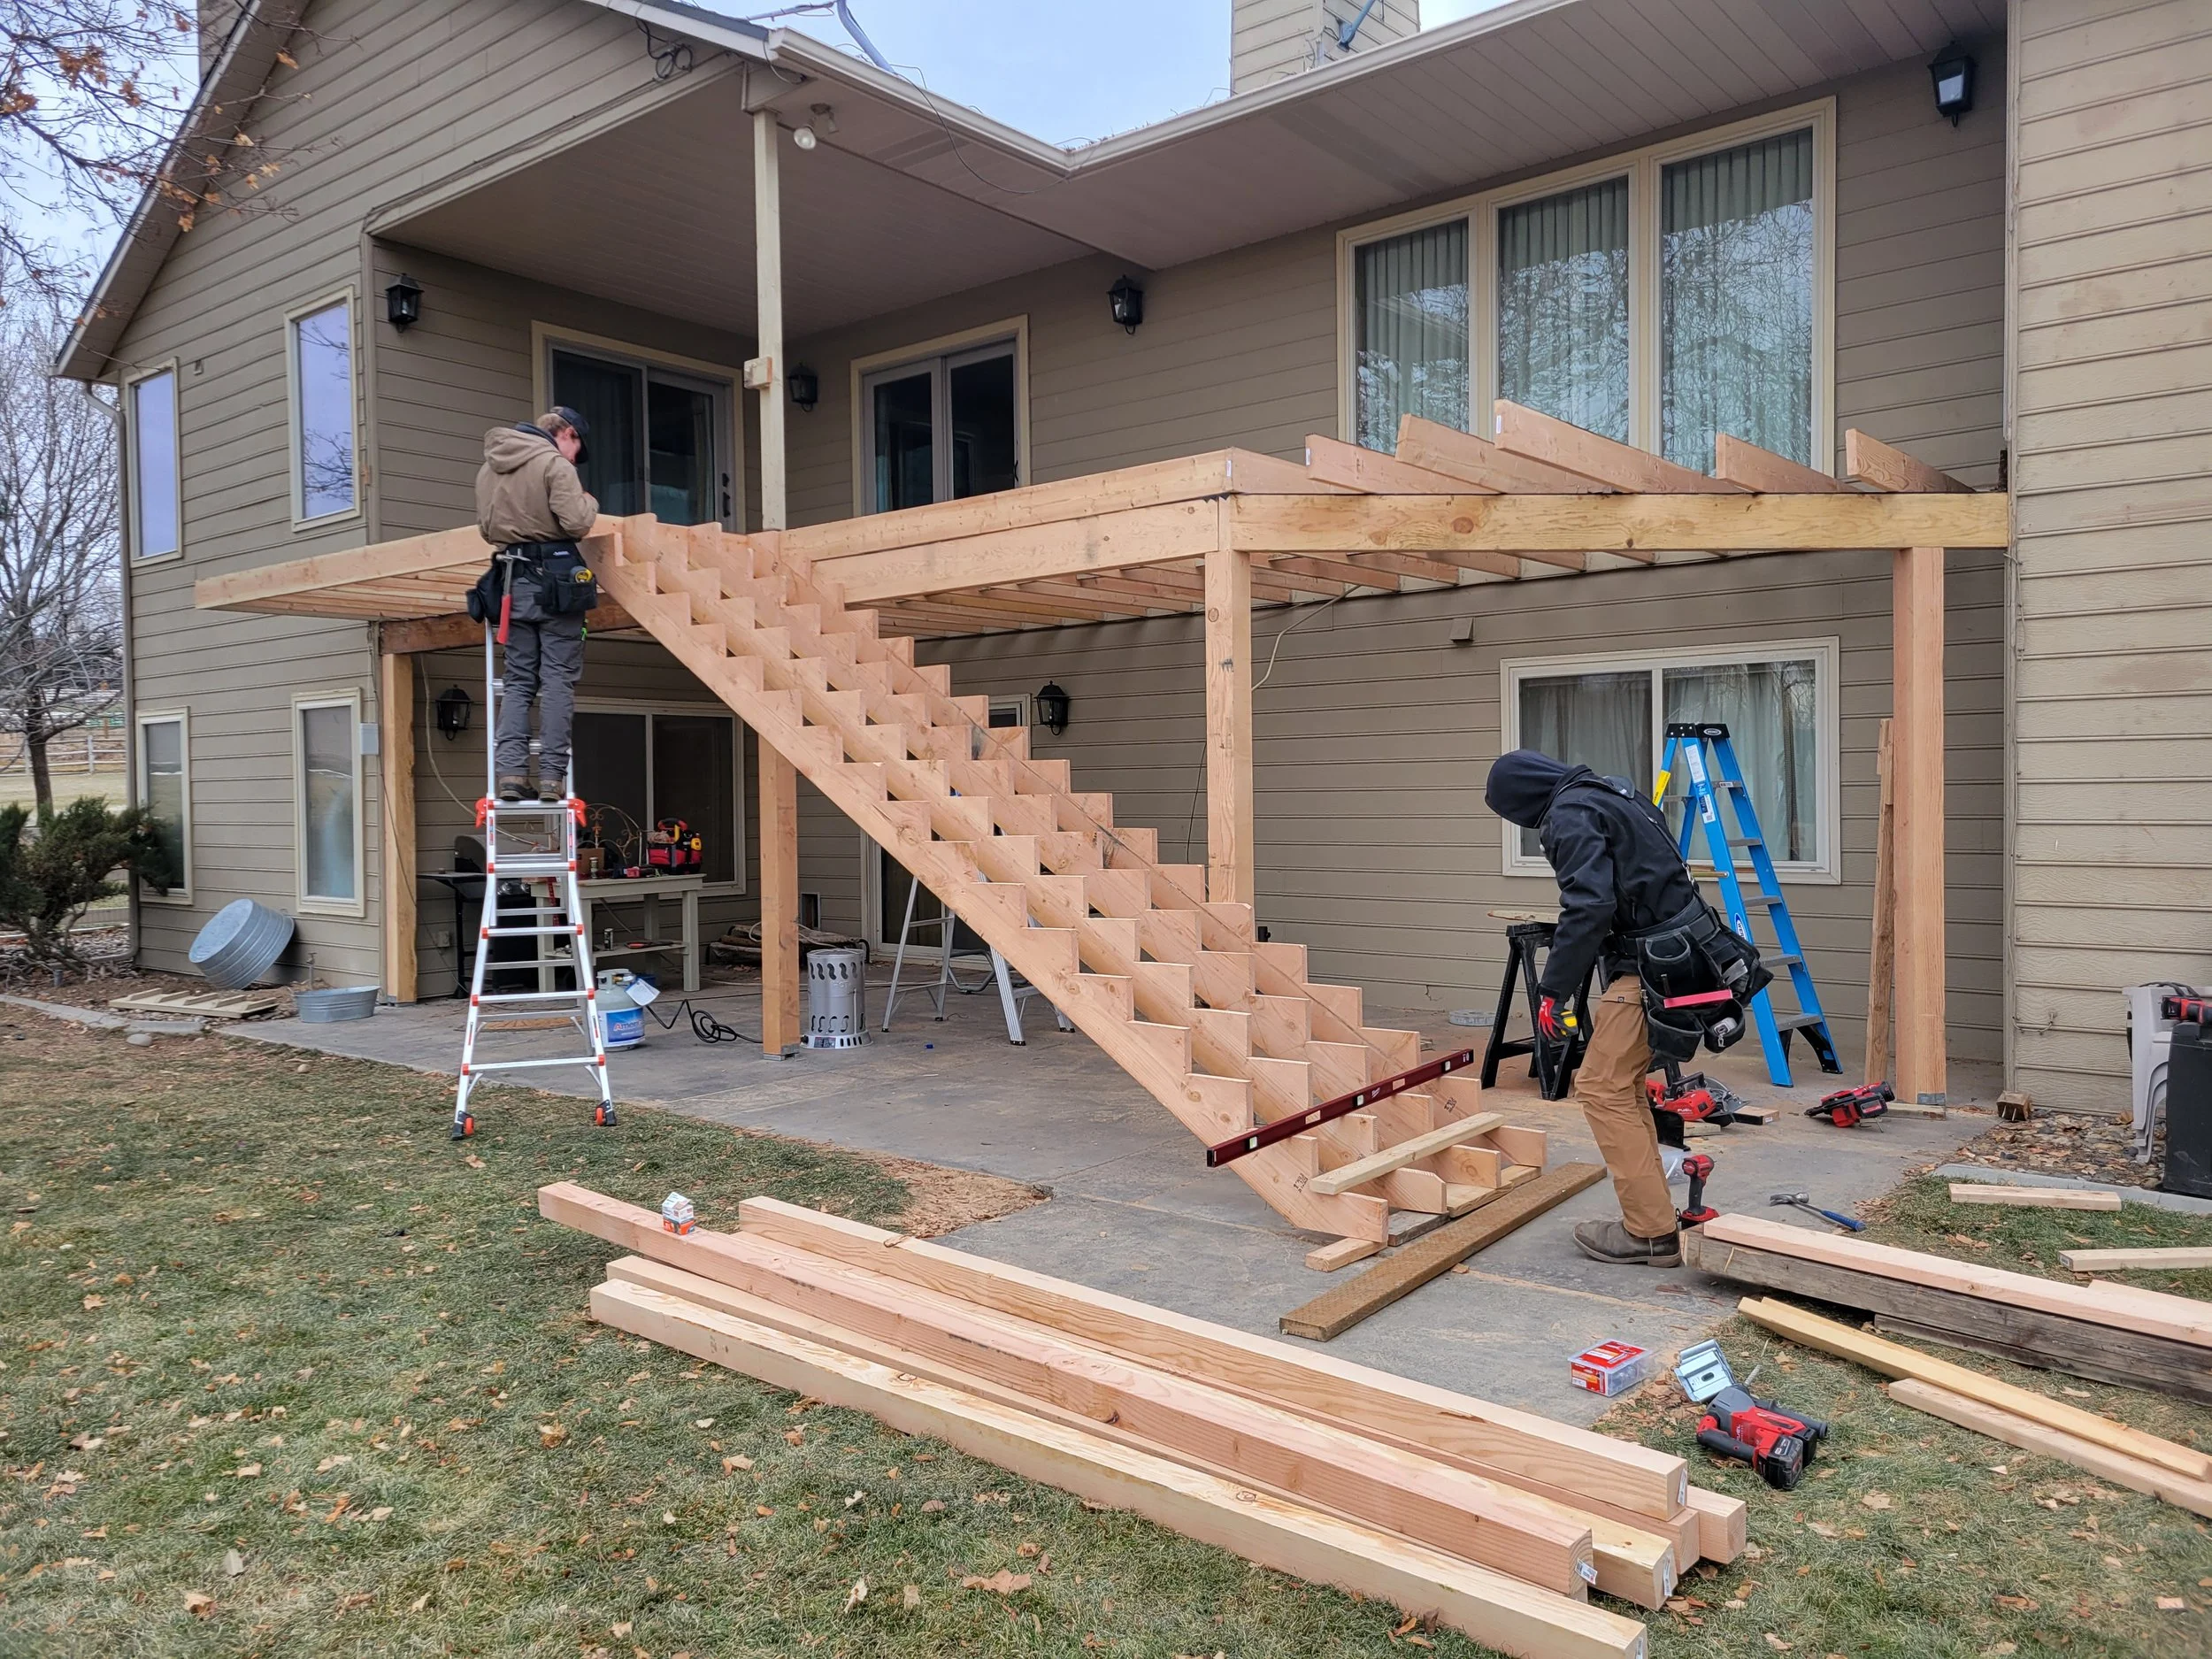
Build Phase (About 1–2 Weeks)
After permits and deliveries, construction moves in steps: footings, framing, decking, then stairs and rails. Weather can nudge schedules, but brief showers rarely stall progress.
Clear yard access, nearby power, and a tidy staging area shave hours that add up. Curves, picture-frame borders, and multiple landings add craft time; simple shapes go faster.
Days 1–2: layout, dig, pour; set posts and bases with proper bracing.
Days 3–5: frame, flash the ledger, begin field-laying deck boards.
Days 6–8: stairs, rail posts/top rails, trims, and punch-list cleanup.
A skilled deck builder sequences tasks so inspections land smoothly and crews stay productive between checks.
Inspections & Final Walkthrough (2–5 Days)
Expect a footing inspection before concrete and a final at the end. Keep stamped plans on site and hardware visible for a quick visit. If a small correction pops up—missing fastener, label, or blocking—same-day fixes keep momentum.
Before sign-off, test gates and lighting, confirm rail stiffness, and sweep the site for screws or offcuts. After approval, review simple care tips for cleaning, snow removal, and seasonal checks.
Footings: often inspected within 24–48 hours of request.
Final: timing depends on the city queue—calling early helps.
Wrap-up: confirm touch-ups, warranty docs, and basic maintenance notes.
Conclusion
Every deck is different, but a clear plan turns the timeline into simple steps you can trust. With steady communication, on-time materials, and quick inspections, “When will it be done?” has an easy answer.
Want a start-to-finish schedule that actually sticks? Call Sunset Decks Idaho at (208) 739-6778—we’ll set the dates, handle the details, and get you relaxing on your new deck sooner.
Deck Safety 101: Railings, Stairs, and Code Must-Haves
Getting ready for a final deck inspection doesn’t have to be stressful. The goal is simple: confirm the rails, stairs, and framing are safe and up to code so you can enjoy the space with peace of mind.
With a tidy site, clear plans, and a few quick touch-ups, the visit often becomes a quick check rather than a headache. Keep reading for easy, homeowner-friendly deck safety inspection tips to glide through the process.
Railings That Check Every Box
Railings protect people, so inspectors look closely. Make sure guardrails meet height rules and feel solid when pushed. Posts need proper blocking or through-bolts, and top rails must resist wobble. Balusters should be spaced so a 4-inch sphere can’t pass through.
Confirm height: most guards need to be around 36–42 inches, depending on code.
Lock posts: add blocking at corners and landings.
Set balusters: measure spacing at both top and bottom.
Before inspection, give the rails a firm shake. If anything moves, tighten hardware or add blocking so it’s rock solid.
Stairs Built for Safe Steps
Stairs get daily wear, so details matter. Keep risers consistent, treads deep enough for a full foot, and handrails graspable. Landings should be level and sized to code. Use corrosion-resistant fasteners, and secure stringers to framing—not just to decking.
Check rise/run: measure each step; keep variations tiny.
Solid handrail: continuous, easy to grip, returned at ends.
Strong stringers: proper cuts, hangers, and support.
Walk the stairs before inspection. If a tread rocks or a rail flexes, fix it now rather than during the visit from the city.
Framing, Footings, and Connections That Last
Good bones make an easy inspection. Footings must meet depth requirements, posts should sit on approved bases, and beams/joists need proper spans. Flash the ledger to protect the house, and use listed connectors—don’t swap hardware mid-build.
Verify frost depth before you dig and pour.
Use hangers and ties that match your lumber size.
Keep gaps for drainage; don’t trap water against framing.
This is where a skilled deck builder shines: clean structure, correct connectors, and details the inspector can trust at a glance.
Paperwork, Cleanliness, and Final Touches
Many “fails” aren’t structural—they’re simple misses. Keep approved plans on site, open to the right page. Clear sawdust, set aside tools, and leave all connectors visible.
If you added lights or a gas stub, make sure those permits and tests are ready too. Homeowners often ask for tips to prepare your deck for final safety inspection; our short list is: tidy the site, label parts on the plans, and be present to answer quick questions.
Plans on site: stamped set, easy to read.
Site tidy: clear access to footings, stairs, and rails.
Be available: quick answers keep the visit moving.
Partnering with deck builders Boise ID helps here—we align paperwork and details so your inspection is straightforward, and an experienced deck builder can handle any last-minute tweaks on the spot.
Conclusion
Great inspections aren’t luck—they come from a few smart steps: firm rails, consistent stairs, clean structure, and plans ready to show. Do a quick walk-through, tighten anything loose, and you’re set. For a calm, on-time sign-off, call Sunset Decks Idaho at (208) 739-6778—we’ll fine-tune the details and help you get that final “approved” so you can enjoy the deck.

Composite vs. Wood: Which Deck Lasts Longer with Less Maintenance?
Choosing deck boards is a big decision. Homeowners want a surface that looks great, feels solid, and doesn’t demand constant upkeep. In climates with hot summers and cold snaps, materials perform differently over time. This guide compares composite and wood so you can pick what fits your budget, style, and maintenance comfort level.
Know the Basics
Composite is a blend of wood fibers and plastics, often capped to resist stains and fading. Wood (cedar or pressure-treated) brings classic grain and a warm feel. Which decking material lasts longer in Boise is a common question, and the answer depends on care, sun exposure, and foot traffic. A knowledgeable deck builder will review yard conditions—shade, drainage, and wind—before recommending a path.
Composite: Stable color choices and a cap layer that fights stains and fading; cleaning is usually just soap, water, and a soft brush for most spills.
Wood: Natural grain and warmth with a lower upfront price; expect regular sealing and careful cleaning to keep boards smooth and looking fresh.
Lifespan and Maintenance
Most capped composites hold color and shape for many years with simple cleaning. Wood can last, too, if sealing and hardware checks stay on schedule. Proper joist spacing, ventilation, and board gaps—set by an experienced deck builder—extend life for any material.
Composite: Resists rot and insects; routine rinse and mild wash remove pollen and grime without sanding or staining.
Wood: Needs periodic stain or seal to block moisture and UV; plan seasonal checks for raised fasteners, splinters, and worn finish.
Cost and Value Over Time
Wood often starts cheaper. Composite may cost more upfront but can save money later by cutting stain, sealers, and sanding time. A fair estimate should include rails, stairs, and hardware, not just the boards. Consider “time value,” too—weekends saved on upkeep are worth something.
Wood: Lower initial spend; higher yearly care for finish, cleaning supplies, and occasional board replacement.
Composite: Higher initial spend; lower ongoing costs, and a more predictable look year to year.
Slip, Heat, and Everyday Comfort
Comfort matters day to day. Some boards feel hotter underfoot in full sun; others offer better traction when wet. Testing samples at home helps you feel the difference before you commit.
Heat & Color: Dark tones absorb more heat; choose mid or lighter shades for bare-foot comfort on sunny, south-facing decks.
Traction: Look for slip ratings and surface textures that keep grip on stairs and entries, especially during rain or snowmelt.
Choosing What Fits Your Home
The best choice depends on how you live. Do you host often, grill on the deck, or need tough stair treads for kids and pets? Materials behave differently in full sun versus shade. Matching boards to exposure and use—and following manufacturer specs—helps protect warranties. Partnering with professional deck builders Boise ID keeps the process simple and avoids mistakes that shorten a deck’s life.
Conclusion
Both composite and wood can look beautiful and perform well when built right. Compare samples, costs, and care needs, then choose the path that fits your home and routine. Ready to decide with confidence? Call Sunset Decks Idaho at (208) 739-6778—let’s design a deck that lasts and looks amazing.
Best Deck Materials for Heat, Snow, and Everything Between
Choosing the right decking makes your space look great and last longer. Sun, snow, and big temperature swings can be tough on boards and hardware. As a team that designs and builds every day, we help you pick materials that fit your budget, your style, and our climate—so your deck stays strong and easy to care for.
Understand What Weather Really Does to Decks
Hot sun can fade color. Winter moisture can swell boards. Freeze–thaw cycles stress fasteners. That’s why we look at performance first, not just price. What to consider when choosing deck materials for Boise’s climate includes UV resistance, traction when wet, and how boards handle expansion.
Sun exposure: Ask how the product resists fading and surface heat. Brands publish test data; darker tones run warmer, so consider lighter shades in full sun to keep bare feet comfortable.
Wet traction: Check slip ratings for rainy or snowy days. Some textures shed water better and keep grip, which matters on stairs and near doors.
Movement & gaps: Confirm expansion specs and the required board spacing. Proper gaps prevent cupping, pooling, and squeaks as temps swing.
Composite, PVC, or Wood: What Lasts and Why
Composite boards resist rot and need little upkeep. PVC decking is ultra-low-maintenance and handles moisture well. Quality wood (like cedar or pressure-treated) looks warm and natural with regular care. A seasoned deck builder can explain how joist spacing, fasteners, and ventilation affect the lifespan of each option.
Composite: Low maintenance with color-through caps that fight stains. Expect routine soap-and-water cleaning instead of sanding and re-staining.
PVC: Top moisture resistance and consistent color. Great for splash zones and shaded areas where mildew can grow on other materials.
Wood: Classic grain and rich tone. Plan on sealing, and choose screws and stains that match to keep the look intentional.
Framing, Fasteners, and Finishes Matter
Even great boards fail if the substructure isn’t right. We size joists for span and bounce, choose corrosion-resistant hardware, and use hidden fasteners where they make sense.
Proper gaps let water drain, and boards move with temperature. An experienced deck builder will also spec flashing at the ledger, correct post bases, and code-approved rail connections.
Hardware choice: Use hot-dipped galvanized or stainless where exposure is high. Coastal-grade hardware lasts longer and prevents ugly rust streaks.
Ventilation: Leave airflow under the deck to dry framing after storms. Trapped moisture shortens life and can void warranties.
Water management: Flash the ledger, slope surfaces slightly, and add drip edges on fascias so runoff goes away from the house.
Budget Smart Without Sacrificing Quality
You don’t have to overspend to get a durable deck. We often pair a value composite with premium railing, or use PVC on stairs and landings for extra traction.
Simple borders and picture-frame edges add style without big labor costs. Partnering with deck builders Boise ID helps you balance cost, care, and curb appeal—so you get the look you want and the lifespan you expect.
Invest where it counts: Upgrade high-wear zones (stairs, entries, grill areas) and choose tougher boards there; save on low-traffic corners.
Color strategy: Mid-tones hide dust and footprints better than very light or very dark hues, cutting down on daily cleanup.
Design efficiency: Clean layouts reduce waste and cuttime on cuts and blocking, keeping the budget focused on materials that last.
Conclusion
The best deck feels great on day one and still looks sharp years later. We help you choose materials that fit our weather, your routine, and your budget—then build them the right way. Ready to plan your project? Call Sunset Decks Idaho at (208) 739-6778 and let’s design a deck that lasts and looks amazing!

Deck Permits Made Easy: A Simple Homeowner Checklist
Adding a new deck should feel exciting, not confusing. Permits protect your family, preserve value, and keep timelines clear. The city wants safe railings, solid footings, and accurate plans that meet code. When you work with us, we map the process, prepare clean drawings, and answer plan-check notes fast so your build moves forward without surprises.
When You Need a Permit
A permit is usually required if the deck is attached, raised above a set height, or includes stairs and guardrails. The city also checks setbacks and utility easements before work begins.
If you add lighting or a gas stub, separate trade reviews may apply. We confirm thresholds with the local office and review HOA standards early so colors, placement, and materials align.
Attached or elevated designs often trigger permits and inspections.
Trades like electrical or gas can extend review time—plan ahead.
Early HOA coordination prevents rework or approval delays.
What to Submit With Your Application
Strong applications get faster approvals. We build a clean package so reviewers can say “yes” the first time. Include a simple site plan with home outline, property lines, setbacks, and the deck footprint with clear dimensions.
Add framing details (joist size/spacing), beam spans, footing depth, stair/railing notes, and exact hardware, so loads are easy to verify.
Product sheets for decking and connectors help reviewers confirm performance. If drawings feel tricky, a licensed deck builder can produce code-ready plans that read clearly.
Site plan: footprint, setbacks, and measurements labeled neatly.
Build details: joists, beams, posts, footings, stairs, and rails.
Product info: spec sheets for decking and connectors.
How to Speed Up Approval
Homeowners often ask how to get a deck permit approved fast in Boise. The secret is clear paperwork and quick replies. Match the city’s checklist, and label every beam, joist, and connector. Double-check snow load, footing depth, guard height, and stair rise/run before submission; those details cause most corrections. When comments arrive, respond the same day with clearly marked revisions.
Partnering with professional deck builders Boise ID also helps. We understand typical redlines and present solutions that meet code without overbuilding. Working with an experienced deck builder keeps paperwork tight and schedules on track.
Mirror city labels and page order to speed the first read.
Pre-verify spans and loads with manufacturer tables.
Return corrections within 24 hours to hold your place.
Inspections and Common Mistakes
Plan for two inspections: footings (before concrete) and final (after stairs and railings). Keep stamped plans on site so the inspector can verify details quickly. Most delays come from shallow footings, missing hardware, unflashed or under-fastened ledgers, and rail posts without proper blocking.
We pre-check these during framing to avoid re-inspections. If a correction is needed, we schedule fast and provide photos of fixes to maintain momentum. A tidy site and clear access make inspections smoother.
Follow local frost depth for footing bottoms.
Use listed connectors; don’t swap hardware mid-build.
Show ledger flashing and post blocking exactly as drawn.
Conclusion
Permits don’t have to be stressful. With clean plans, quick responses, and the right help, your deck can move from idea to “approved” fast.
Ready to make it simple? Call Sunset Decks Idaho at (208) 739-6778—we’ll plan, submit, and build your deck the right way the first time!
Lighting Ideas to Illuminate Your Deck: Best Solutions for Every Mood
Lighting can completely transform the atmosphere of your deck, making it more inviting and functional for evening relaxation or entertaining. Whether you want soft ambient lighting or bright task lighting, there are a variety of options to enhance your outdoor space. Here are some of the best lighting solutions for decks in Eagle ID, and how deck builders can help bring them to life.
1. Choose Pet-Friendly Decking Materials
One of the most important aspects of creating a pet-friendly deck is choosing the right decking materials. Some materials are better suited for pets, offering both comfort and safety.
Slip-Resistant Surfaces: Look for decking materials that provide traction, such as composite decking or textured wood. This helps prevent pets from slipping, especially when the deck is wet.
Non-Toxic Materials: Ensure the materials used are non-toxic, as pets tend to chew on surfaces. Composite decking often uses safe, pet-friendly materials that won’t harm your animals.
Pro Tip: Choose decking that’s easy to clean and doesn’t absorb dirt or pet waste, making your deck more hygienic for your pets.
2. Create Safe Boundaries with Pet-Friendly Railings
Pet safety is a primary concern when designing a deck. Railings are one of the best ways to keep pets safe and contained while giving them the freedom to roam.
Tightly Spaced Railings: Make sure the space between the slats or rails is narrow enough to prevent pets from squeezing through or getting stuck.
Pet-Proof Barriers: Install barriers or gates to prevent your pets from accessing areas that may be unsafe, such as stairs or the edges of the deck.
Tip: If your pets are small or like to climb, consider adding a mesh or netting to the railing for added security.
3. Provide Shade and Cooling Areas
Just like humans, pets can overheat, especially in hot weather. Ensuring that your deck has adequate shade and cooling areas is essential to keeping your pets comfortable.
Shaded Areas: Use umbrellas, awnings, or a pergola to provide shade for your pets, especially if they spend a lot of time outdoors.
Cooling Mats: Invest in cooling mats for your pets to rest on when it’s particularly hot. These mats help regulate their body temperature and provide them with a comfortable spot to cool off.
Pro Tip: Under-rail lights can be paired with motion sensors, so the lights turn on automatically when someone is nearby, enhancing both convenience and energy efficiency. Work with deck builders Eagle ID to seamlessly integrate these features into your deck design.
4. Incorporate Pet-Friendly Landscaping
Incorporating landscaping into your deck design not only enhances its aesthetic but also provides natural areas where your pets can explore safely.
Pet-Safe Plants: Choose non-toxic plants for your deck to avoid any harmful reactions if your pets decide to nibble. Pet-friendly plants like marigolds, petunias, and lavender are great options.
Outdoor Furniture and Shade: Use comfortable outdoor furniture where your pets can lie down in the shade or close to you, ensuring they can enjoy the deck alongside you.
Tip: Consider a pet-friendly garden area with plants that provide a space for your pets to explore and relax.
Conclusion
Creating a pet-friendly deck is all about making the space safe, comfortable, and enjoyable for your pets. From choosing the right materials to adding safe railings, providing shade, and incorporating pet-friendly landscaping, there are plenty of ways to ensure that your deck is a pet-friendly retreat.
Ready to build a deck that’s perfect for your pets? Call Sunset Decks Idaho at (208) 739-6778 today, and let our deck builders help you create an outdoor space where both you and your pets can enjoy time together!
Is a Rooftop Deck Right for You? Everything You Need to Know Before Building
A rooftop deck can be an incredible addition to your home, offering a private outdoor space with stunning views. But before you start planning, it’s essential to understand the requirements, challenges, and steps involved in building a rooftop deck. Here's everything you need to know.
1. Check Local Zoning Laws and Permits
Before starting any rooftop deck project, you must first understand local zoning laws and building codes. These laws determine if you can legally add a rooftop deck and what regulations you must follow.
Permits and Approvals: Building a rooftop deck requires permits, and these may vary depending on where you live. In many cities, you'll need to submit detailed plans to your local building department for approval.
Height Restrictions: Some areas have restrictions on how tall your deck can be, especially if it could obstruct your neighbors’ views or privacy.
Pro Tip: Hire experienced deck builders Eagle ID who are familiar with local building codes to ensure your project goes smoothly and meets all legal requirements.
2. Structural Considerations and Engineering
Building a rooftop deck requires strong structural support. You’ll need to ensure that your roof can handle the weight of the deck and any furniture or people using it.
Roof Capacity: Most standard roofs are not designed to hold the additional weight of a deck, so you may need to reinforce the existing structure.
Professional Engineering: A structural engineer will be needed to evaluate the roof’s ability to support the deck and to design the reinforcement needed.
Expert deck builders can provide expert advice on how to build a rooftop deck in Eagle ID, ensuring your roof is reinforced properly.
3. Design and Access to the Roof
The design of your rooftop deck will play a significant role in both its functionality and aesthetic appeal. You’ll also need to plan how you’ll access the deck.
Access Options: Typically, rooftop decks are accessed through a staircase or ladder from inside the house. You can either add a spiral staircase for a compact design or a larger staircase for easier access.
Design Features: Think about what features you want on the deck, such as railings, lighting, seating areas, and even plants. You’ll want your design to blend with the architecture of your home.
Pro Tip: Consider adding privacy screens or tall plants to create a more secluded environment, especially if your deck overlooks a busy street or neighboring properties.
4. Waterproofing and Drainage
Proper waterproofing and drainage are essential when building a rooftop deck. Without these features, you risk water damage to both the deck and the structure below.
Waterproof Membranes: Installing a waterproof membrane under the deck will prevent water from seeping through to the roof. This helps protect both your deck and the underlying structure.
Proper Drainage: Ensure your rooftop deck is designed with adequate drainage systems to avoid pooling water, which could damage the deck or cause leaks.
Tip: Work with professionals who can install a drainage system that fits your roof's design, ensuring water flows off the deck properly.
Conclusion
Building a rooftop deck can be an exciting project that adds value and usable space to your home. However, it’s crucial to plan carefully and consult professionals to ensure the deck is structurally sound, legally compliant, and safe. From obtaining permits to ensuring proper waterproofing and drainage, there’s a lot to consider before you start.
Interested in building a rooftop deck? Call Sunset Decks Idaho at (208) 739-6778 today, and let our deck builders help you turn your rooftop into a beautiful and functional outdoor space!
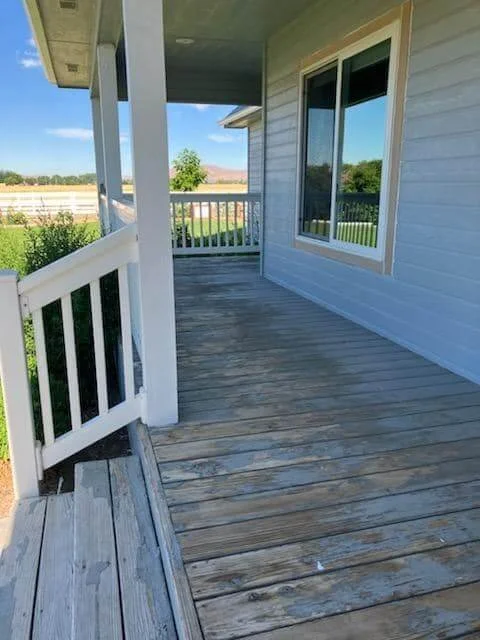
Preparing Your Deck for Every Season: Seasonal Maintenance Tips
Your deck is an investment that can provide years of enjoyment, but just like any outdoor feature, it requires seasonal care to maintain its beauty and functionality. Preparing your deck for each season ensures it remains safe, durable, and ready for use. Here are some essential tips for preparing your deck for every season with the help of expert deck builders.
1. Spring: Clean and Restore Your Deck
After the winter months, your deck will need a thorough cleaning and inspection to get it ready for warmer weather.
Power Wash: Use a power washer to remove dirt, grime, and any mold or mildew that may have accumulated over the winter. Be sure to use a mild cleaner to avoid damaging the wood.
Inspect for Damage: Check for any cracks, splinters, or loose boards. Repair any issues before you start using the deck frequently.
Restain or Seal: If your deck has a wooden surface, spring is a great time to restain or reseal it. This helps protect the wood from moisture and UV damage.
Pro Tip: Always allow your deck to dry thoroughly before sealing or staining it to ensure the finish adheres properly. Work with deck builders Eagle ID to ensure the job is done right.
2. Summer: Keep It Cool and Comfortable
During the summer months, your deck should be a comfortable retreat for relaxation and entertaining. Here’s how to keep it looking great and feeling cool.
Shade Solutions: Add shade elements such as umbrellas, awnings, or a pergola to protect yourself and your guests from the sun.
Check for Wear and Tear: Summer brings increased use, so regularly inspect the deck for any damage from furniture or heavy foot traffic.
Clean Regularly: Sweep away debris like leaves, twigs, or dirt. Clean spills immediately to prevent staining from outdoor food and drinks.
Tip: Use outdoor rugs to add color and comfort while protecting the deck from heavy furniture.
3. Fall: Prepare for the Cold and Clean Up
As temperatures begin to cool down, your deck will need to be prepped for the upcoming winter months.
Remove Fallen Leaves: Clean leaves and debris off the deck regularly to prevent them from rotting and causing stains or mold growth.
Seal or Reseal: If you didn’t seal your deck in the spring, now is a good time to do it. This adds a protective layer to shield the wood from winter’s moisture.
Check for Loose Boards or Nails: Inspect the deck for any boards that have become loose or nails that need tightening. This ensures your deck is safe before winter sets in.
A deck builder can help you with these seasonal tasks to make sure your deck is ready for any weather.
4. Winter: Protect Your Deck from the Elements
Winter can be harsh on decks, especially if they’re exposed to snow and ice. Protecting your deck during this time is essential for maintaining its longevity.
Clear Snow and Ice: Regularly remove snow and ice from your deck, but avoid using salt or chemicals that can damage the wood. Use a plastic shovel or a broom to gently clear away the snow.
Cover the Deck: If possible, cover your deck with a tarp or weatherproof cover to shield it from snow, ice, and rain.
Inspect for Winter Damage: After the season ends, inspect your deck for any damage caused by the cold and moisture. Look for cracks, warping, or any other issues.
Tip: Consider investing in deck furniture covers to protect your furniture from the elements and extend its lifespan.
Conclusion
Preparing your deck for each season is crucial to its upkeep. By cleaning, repairing, and protecting your deck seasonally, you can ensure that it remains a beautiful and functional space for years to come. If you’re wondering how to maintain your deck through all seasons in Eagle ID, professional help is available to guide you through the process.
Need help maintaining your deck? Call Sunset Decks Idaho at (208) 739-6778 today for expert care and maintenance services!

Essential Deck Maintenance Tips to Keep Your Outdoor Space Beautiful
Lighting can completely transform the atmosphere of your deck, making it more inviting and functional for evening relaxation or entertaining. Whether you want soft ambient lighting or bright task lighting, there are a variety of options to enhance your outdoor space. Here are some of the best lighting options for your deck in Eagle ID.
1. Install String Lights for a Cozy, Ambient Glow
String lights are an easy and affordable way to add a warm, magical feel to your deck. They’re perfect for creating an intimate ambiance for evening gatherings or solo relaxation.
Overhead Hanging: Drape string lights across the deck or between trees to create a canopy of light.
Vertical Draping: Hang lights vertically along railings or posts for an eye-catching design that adds charm.
Pro Tip: Use LED string lights to save on energy costs while still achieving a beautiful glow.
2. Use Deck Post Lights for Practical and Decorative Illumination
Deck post lights are not only practical for providing light along walkways and stairs, but they also add a stylish, modern touch to your deck.
Integrated into Posts: Install small lights directly into the top of your deck posts to illuminate the perimeter without overwhelming the space.
Subtle and Sleek: These lights come in various finishes, such as stainless steel or bronze, to complement your deck’s aesthetic.
Tip: Deck post lights can help prevent accidents by illuminating edges and steps, making your deck safer at night. Deck builders Eagle ID can help choose the right fixtures that match your deck's style and needs.
3. Add Under-Rail Lighting for a Subtle, Elegant Effect
Under-rail lighting is perfect for adding a soft, elegant glow to your deck’s railings. This type of lighting creates a beautiful effect without being too bright or intrusive.
LED Tape Lights: Install LED tape lights underneath the railing to create a soft light that’s both functional and visually appealing.
Mood Lighting: Under-rail lighting is ideal for creating a relaxing, low-light atmosphere in your outdoor space.
Pro Tip: Ask your deck builder to pair under-rail lights with motion sensors, so the lights turn on automatically when someone is nearby.
4. Highlight Your Deck’s Features with Spotlights
If you have specific features you’d like to highlight, such as sculptures, plants, or seating areas, spotlights can add a dramatic effect while showcasing these elements.
Garden Spotlights: Position spotlights to shine on plants or garden features, creating a beautiful, focal point.
Wall-Mounted Spotlights: Use wall-mounted spotlights to highlight any architectural features on your deck, such as trellises or water features.
Tip: Consider dimmable spotlights so you can adjust the lighting intensity depending on the occasion.
Conclusion
Choosing the right lighting for your deck can elevate the space, making it perfect for evening enjoyment and creating the ideal atmosphere. Whether you opt for string lights, deck post lights, under-rail lighting, or spotlights, each lighting solution has its own charm and function.
Want to transform your deck with beautiful lighting? Call Sunset Decks Idaho at (208) 739-6778 today, and let us help you create the perfect outdoor lighting design for your space, with the help of expert deck builders.
Achieving Ultimate Privacy: Deck Design Ideas for Quiet Retreats
In suburban areas, privacy can be a concern, especially if your deck is exposed to neighbors or street views. Thankfully, there are various ways to enhance the privacy of your outdoor space while still maintaining a stylish and open feel. Here are some ideas to help you create a more private, peaceful retreat on your deck.
1. Install Privacy Screens or Fencing
One of the most straightforward ways to add privacy is by installing privacy screens or fencing around your deck. These can block out unwanted views while still offering an aesthetic appeal.
Lattice Screens: Lattice panels offer a semi-private solution, allowing air to flow while obstructing sightlines. You can customize the height and design to suit your style.
Solid Fencing: For a more private setting, solid wood or composite fencing works great. It’s sturdy, durable, and provides a completely enclosed feeling.
Pro Tip: Consider adding decorative elements to the fence, such as plants or lighting, to make it both functional and attractive. Deck builders Boise ID can assist you in designing a fence that matches the look and feel of your home.
2. Use Outdoor Curtains or Drapes
Outdoor curtains or drapes are an easy and cost-effective way to create privacy without compromising on style. They add an element of softness to your deck, and the best part is they’re adjustable.
Curtains with Tiebacks: For more flexibility, use curtains with tiebacks that you can pull open when you want a more open feel and close when you need privacy.
Weatherproof Fabric: Choose materials that are weather-resistant to ensure durability, especially if your deck is exposed to harsh elements.
Tip: Curtains provide a great option if you want the ability to change the level of privacy based on your mood or the occasion.
3. Add Tall Plants and Greenery
If you prefer a natural approach to creating privacy, tall plants and greenery can work wonders. Planting large shrubs, trees, or climbing vines on your deck can act as a beautiful, organic privacy barrier.
Potted Trees: Consider using tall potted plants like bamboo, ornamental grasses, or small trees. They can grow quickly and fill in space while providing a soft privacy shield.
Climbing Vines: Planting vines like ivy or wisteria along trellises or fencing can offer year-round greenery and create a lush, private atmosphere.
Pro Tip: Use a mix of potted plants and climbing vines for varying heights and texture. Consult with deck builders to help you select the best plants for your climate.
4. Use Deck Rails to Add Seclusion
Your deck railings can also play a part in adding privacy. By installing taller railings or using a combination of materials, you can block unwanted views while maintaining an open feel.
Glass or Acrylic Panels: Clear glass panels provide a modern, sleek look while still adding privacy. They’re perfect if you want to maintain visibility of your surrounding views but shield your deck from prying eyes.
Wooden Railings: Wooden railings with slats can be spaced closer together to block the view from your neighbors, giving you a more private space without losing the open-air feel.
Best deck builders for privacy decks in Boise ID can help you design custom railings that suit your space perfectly.
Conclusion
With these simple yet effective privacy-enhancing ideas, you can transform your deck into a private sanctuary, perfect for relaxing or entertaining. Whether you choose to install privacy screens, use outdoor curtains, or incorporate greenery, there are many ways to make your deck feel like a secluded retreat.
Ready to enhance your deck’s privacy? Call Sunset Decks Idaho at (208) 739-6778 today, and let our deck builders help you create the perfect private outdoor space!

Maximize Your Outdoor Space: Deck Design Tips for Small Yards?
A well-designed deck can turn a small or unused outdoor area into a functional and stylish space. Whether you have a compact backyard or a spacious garden, maximizing your outdoor space with a deck can enhance your lifestyle. Here are some ideas to help you make the most of your available space with the help of expert deck builders Boise ID.
1. Use Vertical Space for More Functionality
If your outdoor space is limited, it’s important to think vertically. By utilizing the vertical space, you can create a more functional and visually appealing deck.
Built-In Shelves and Planters: Add shelves or planters along the railing or on the deck walls to store plants, decorations, or outdoor essentials.
Vertical Gardens: Install vertical gardens to grow herbs, flowers, or even vegetables without taking up much floor space.
Pro Tip: Adding vertical elements not only increases space efficiency but also adds a green touch to your deck.
2. Create Multiple Zones for Different Activities
When building a deck, it’s easy to create multiple zones for different activities, helping you maximize the utility of your outdoor space.
Dining Area: Dedicate one area of the deck to a dining table, where you can enjoy meals with family and friends.
Lounge Area: Set up a cozy corner with comfortable seating, cushions, and a coffee table for relaxation.
Outdoor Kitchen or Bar: If you enjoy entertaining, consider adding a small outdoor kitchen or bar area for cooking and drinks.
If you're wondering, what are the best deck design ideas for small backyards? The key is to create distinct areas for different functions, allowing you to make the most of your space without feeling crowded.
3. Incorporate Smart Storage Solutions
Storage can be a challenge in smaller outdoor spaces, but there are creative ways to integrate smart storage solutions into your deck with the help of deck builders.
Built-In Benches with Storage: Instead of having separate storage boxes, build benches that double as storage compartments for outdoor cushions, toys, or gardening tools. This design saves space and offers convenient seating.
Under-Deck Storage: If your deck is elevated, consider utilizing the space underneath for storing outdoor furniture, equipment, or seasonal items. With proper weather protection, this area can be a great hidden storage spot.
Pro Tip: Hidden storage can help keep your deck organized while maintaining its aesthetic appeal. It also makes cleaning and maintenance easier by keeping clutter out of sight.
4. Opt for Multi-Functional Furniture
When space is tight, multi-functional furniture can make all the difference in maximizing your deck.
Foldable Furniture: Use foldable or stackable furniture that can be easily stored away when not in use. These pieces can be pulled out during gatherings and neatly stored after, saving valuable space.
Convertible Tables and Chairs: Choose pieces that can be used for more than one purpose, such as a table that doubles as a bench or a chair that turns into a footrest. These flexible designs are ideal for small or multifunctional spaces.
Tip: Multi-functional furniture ensures that your deck is both stylish and practical, without cluttering the space. It also allows you to adapt the layout for various occasions.
Conclusion
Maximizing your outdoor space with a deck doesn’t have to be a challenge. By using vertical space, creating separate zones for different activities, incorporating smart storage solutions, and choosing multi-functional furniture, you can transform even a small area into an inviting and functional outdoor retreat.
Ready to make the most of your outdoor space? Call Sunset Decks Idaho at (208) 739-6778 today, and let our deck builders help you design the perfect deck for your needs!

How to Make Your Deck Pet-Friendly and Safe for Your Pets
If you're a pet owner, your deck isn’t just an outdoor retreat for you; it’s a place where your pets can enjoy the fresh air and sunshine too. But to ensure it's safe and comfortable for your furry friends, certain features need to be considered. Here’s how you can make your deck both pet-friendly and safe for your pets with the help of expert deck builders.
1. Choosing the Right Decking Material
When building a pet-friendly deck, material choice plays a huge role in both safety and comfort. Some materials are better suited for pets than others.
Non-Slip Surfaces: Choose materials with a slip-resistant texture to help your pets safely navigate the deck, especially when it's wet.
Durable Materials: Opt for decking materials that are strong enough to withstand the wear and tear caused by claws and rough play, such as composite decking or pressure-treated wood.
Composite decking is a popular option among deck builders as it’s durable, easy to clean, and resistant to scratches, making it ideal for pet owners. It’s one of the best materials for pet-safe decks, offering safety and ease of maintenance.
2. Creating a Safe Enclosure for Pets
If you want to let your pets roam freely without worry, a safety enclosure is essential. This keeps your pets from wandering off the deck while still giving them access to the space.
Pet-Friendly Railings: Make sure your railings are designed to prevent pets from slipping through or climbing over. Opt for tightly spaced vertical rails or horizontal cable rails.
Pet Gates: Install pet gates or barriers to prevent your pets from accessing certain areas or falling off the deck.
Tip: A high-quality pet fence will not only keep your pets safe but also provide them with a space to enjoy the outdoors without the risk of escaping.
3. Providing Shade and Comfort for Your Pets
Pets, especially dogs, can get overheated in the sun. To make your deck a more comfortable space for them, it’s important to add some shade and cool areas.
Shade Structures: Install a pergola or an awning over part of your deck to offer some relief from the sun.
Cooling Mats: Consider adding a cooling mat in shaded spots where your pets can relax comfortably during hot weather.
Pro Tip: Ensure your pets always have access to fresh water while they’re on the deck, especially during warm weather.
4. Ensuring Pet Safety with Non-Toxic Plants and Clean Surfaces
Pets tend to explore with their mouths, so it’s crucial to ensure that everything on your deck is safe for them.
Non-Toxic Plants: Choose pet-safe plants like petunias, marigolds, or herbs that aren’t toxic to animals.
Regular Cleaning: Clean your deck regularly to remove pet waste, food crumbs, or any substances that could harm your pets.
Tip: Use pet-safe cleaning products to avoid exposing your animals to harmful chemicals.
Conclusion
Creating a pet-friendly deck that’s safe and comfortable for your furry friends doesn’t have to be difficult. By choosing the right materials, adding safe enclosures, providing shade, and ensuring the space is clean, you can make your deck the perfect spot for your pets to relax and play.
Want to create a pet-friendly deck? Call Sunset Decks Idaho at (208) 739-6778 today, and let us help you build the perfect outdoor space for both you and your pets, designed by the best deck builders Boise ID!
How Long Does Deck Construction Take? A Complete Timeline Guide
Building a deck can be a rewarding addition to your home, but how long does it actually take? The timeline for deck construction depends on various factors, including design complexity, material choices, and weather conditions. Let’s break down the typical process to help you plan better.
1. Planning, Design, and Permitting
The process starts with planning and design, which usually takes around 1-2 weeks. This is when you’ll finalize your design with your deck builders Boise ID and choose materials that suit both your style and budget.
After the design is set, you'll need to obtain the necessary permits from your local municipality. Depending on where you live, permitting can take anywhere from a few days to 2 weeks.
Pro Tip: A well-thought-out design helps streamline the next steps and speeds up permit approval, avoiding delays in the process.
2. Site Preparation and Foundation
Once the permits are in hand, the site preparation phase begins. This usually takes 1-3 days, depending on the condition of your yard. If there’s heavy vegetation or uneven terrain, clearing and leveling may take longer. Proper site preparation is crucial for ensuring a stable foundation for your deck.
Groundwork: The land needs to be properly leveled to avoid structural issues down the road.
Site Clearing: Removing obstacles, such as rocks or trees, ensures no delays during construction.
The better prepared your site is, the faster the foundation will be laid.
3. Deck Building and Construction
The actual deck building phase typically takes 5-7 days for a simple deck and up to 2 weeks for more complex decks. During this phase, your builders will:
Build the Frame: The foundational structure is installed first. This includes posts, beams, and support joists to create a solid base.
Install Decking: The surface boards are added, followed by stairs, railings, and any custom features like lighting or built-in seating.
Pro Tip: If the weather is unfavorable, construction might be delayed, so it’s best to schedule during a mild season.
4. Finishing Touches and Clean-Up
Once the structure is in place, deck builders apply the final touches. This includes staining, sealing, and cleaning the construction site. This phase typically takes 1-2 days to complete. Sealing your deck is especially important as it provides protection against the elements, ensuring its longevity.
Staining and Sealing: Helps protect the wood from moisture, UV damage, and pests.
Clean-Up: Ensures the site is cleared of any construction debris, making your new deck ready to enjoy.
Tip: Staining and sealing your deck can also enhance its appearance, adding richness and depth to the wood.
Conclusion
On average, deck construction takes about 2-4 weeks, depending on size, design, and materials. If you're wondering how long does it take to build a custom deck in Boise ID, the process generally falls within this range. By working with experienced deck builders, you can ensure a smooth, efficient process from start to finish. You’ll be able to enjoy your new outdoor space in no time.
Ready to build your dream deck? Call Sunset Decks Idaho at (208) 739-6778 today, and get started on creating your ideal outdoor living space!

Avoid These Deck-Building Pitfalls: Expert Advice for a Flawless Project
Building a deck is an exciting project, but it’s easy to make mistakes that could cost you time, money, and frustration. Whether you're designing your deck yourself or working with a deck builder, here are some common deck-building mistakes to avoid in McCall, ID.
1. Ignoring Local Building Codes and Permits
One of the biggest mistakes you can make is not checking with your local government about necessary permits and building codes. McCall has specific regulations in place to ensure decks are safe and structurally sound.
Permits: You may need a permit for your deck, depending on its size and location. Working with a professional deck builder can ensure that your project is in compliance.
Building codes: Local codes might require certain materials, structural reinforcements, or design elements to meet safety standards. Failing to follow these rules can result in fines or delays.
To avoid costly mistakes, always check with local authorities and make sure your builder is familiar with McCall’s building codes.
2. Overlooking Drainage and Water Flow
Improper drainage can cause serious damage to your deck over time, so it’s essential to plan for water flow during the design phase. Here’s what to keep in mind:
Proper slope: Your deck should be slightly sloped to allow water to run off, preventing water from pooling underneath the deck.
Gutter systems: Installing gutters or drainage systems on the deck or around its perimeter can help manage water flow and protect the structure.
Decking material: Some materials, like wood, are more vulnerable to water damage, so ensuring proper drainage will prolong the life of your deck.
By planning for drainage from the start, you can avoid water damage and ensure your deck lasts longer.
3. Choosing the Wrong Materials
The materials you choose for your deck are critical to its durability, maintenance needs, and overall look. Choosing the wrong materials can lead to issues down the line. Here's what to consider:
Wood vs. Composite: While wood is classic, it requires more maintenance and may rot over time. Composite decking is low-maintenance and highly durable but can be more expensive upfront.
Climate considerations: McCall experiences colder winters and a variety of weather conditions, so choose materials that can withstand these changes. Composite or PVC decks often fare better than wood in colder climates.
Finish and texture: Make sure the finish on your materials suits your needs, whether it’s slip resistance, color longevity, or texture.
Selecting the right materials based on your budget, aesthetic preferences, and local weather conditions will save you from future headaches.
4. Underestimating the Importance of Proper Framing
A deck’s framing is the skeleton that supports everything above it, and neglecting this step can lead to a weak, unstable structure. Here’s why framing matters:
Strong foundation: Without proper framing, your deck could sag, warp, or even collapse over time.
Level structure: Ensuring the framing is level and properly aligned is critical for a safe and durable deck.
Quality materials: Using quality materials for framing—such as pressure-treated wood or steel—can provide additional strength and stability.
Make sure your deck builder McCall ID invests enough time and effort into getting the framing right for a deck that will last.
Conclusion
Building a deck is rewarding, but avoiding common mistakes is key to success. Whether it’s following local codes or choosing the right materials, every detail matters. At Sunset Decks Idaho, we have years of experience in McCall, ID, ensuring your project goes smoothly.
Ready to build your perfect deck? Call Sunset Decks Idaho at (208) 739-6778 for a free consultation today!

Deck Care 101: Essential Maintenance Tips for Year-Round Perfection
A deck is a wonderful addition to your home, offering a perfect space for outdoor activities. However, to keep it in great shape for years, regular maintenance is crucial. Whether you have a wood deck, composite deck, or PVC deck, taking care of it properly ensures its longevity. Here are some essential tips for maintaining your deck in McCall, ID.
1. Clean Your Deck Regularly
The first step in maintaining your deck is regular cleaning. Dirt, leaves, mold, and mildew can quickly accumulate and cause damage if left unattended. Here’s how to keep it clean:
Sweep regularly: Sweep the deck often to remove dirt, leaves, and debris. This prevents buildup that could cause staining or mold growth.
Wash occasionally: Use a deck cleaner or a mild soap solution and a soft brush to wash the surface. For wood decks, avoid harsh chemicals that might damage the finish.
Check for mold: In humid areas, mold can form on the surface. If you notice any mold or mildew, clean it immediately with a cleaner specifically designed for outdoor surfaces.
Regular cleaning helps protect your deck from grime and keeps it looking pristine. Deck builders recommend this as an essential part of your maintenance routine.
2. Inspect and Seal Your Deck
Another key element of deck maintenance is inspecting and sealing the surface. Regular inspections will help you spot any issues early on and keep your deck in top condition. Here's what you should do:
Look for cracks or splinters: Check for any damage or wear in the deck boards. Repair or replace damaged areas before they worsen.
Check the structure: Inspect the support beams, posts, and railings to ensure they are secure. Look for any signs of loosening or deterioration.
Seal wood decks: Wood decks need to be sealed regularly to protect them from moisture and UV damage. Apply a high-quality deck sealant every 1-2 years, depending on your deck’s exposure to the elements.
Sealing your deck helps preserve the wood and prevent long-term damage from weather conditions.
3. Protect Your Deck from the Elements
In McCall, ID, the weather can fluctuate, with snow in winter and sun in summer. Protecting your deck from the elements is important to prolong its lifespan. Here’s how:
Use furniture covers: If you have outdoor furniture, use covers during the off-season to protect them from rain, snow, or sun damage.
Clear snow and ice: During winter, make sure to clear snow and ice off your deck regularly. Use a plastic shovel instead of a metal one to avoid damaging the surface.
Apply UV protection: If you have a wood deck, apply a UV-blocking stain or sealant to prevent fading and cracking from sun exposure.
Taking steps to protect your deck from harsh weather conditions will help maintain its beauty and durability year-round.
4. Perform Regular Maintenance Checks
One of the best ways to ensure the long-term health of your deck is to perform regular maintenance checks with deck builders. Here’s what you should be doing throughout the year:
Spring cleaning: After winter, clean the deck to remove debris and salt.
Annual inspection: Inspect the boards, railing, stairs, and supports for wear or water damage.
Restaining or painting: Wood decks need restaining or painting every 1-2 years.
By staying on top of routine maintenance, you’ll be able to enjoy your deck for many years to come.
Conclusion
Proper deck maintenance in McCall is easy with the right care. By cleaning regularly, inspecting for damage, and protecting it from the elements, you can keep your deck in top condition. At Sunset Decks Idaho, our deck builders McCall ID are here to help with all your deck maintenance needs.
Ready to build your custom deck? Call Sunset Decks Idaho at (208) 739-6778 for a free consultation and estimate today!
Why Custom Decks Are the Ultimate Outdoor Upgrade
A custom deck can transform your outdoor space into something truly special, whether you're looking for a place to entertain, relax, or enjoy the beauty of McCall, ID. Here’s why building a custom deck is worth the investment and how it can enhance your home.
1. Tailored to Your Needs and Style
One of the biggest advantages of building a custom deck is that it’s designed to suit your exact needs and preferences. Unlike pre-built, cookie-cutter decks, custom decks offer:
Personalized design: Whether you prefer a cozy retreat or a large entertainment area, a custom deck can be designed to fit your vision.
Functionality: You can customize the layout to meet your needs, whether you want a grilling area, built-in seating, or space for an outdoor hot tub.
Unique features: Add unique elements like decorative railings, lighting, or even multi-level designs that match your personal style.
With a custom deck, you have full control over the design and functionality, ensuring it’s everything you want it to be.
2. Increased Home Value
A well-built custom deck adds value to your home. Potential buyers often see a beautiful deck as a major selling point. Here’s how a custom deck boosts your home’s appeal:
Increased curb appeal: A well-designed deck can enhance the exterior of your home, creating an inviting atmosphere.
Higher resale value: A high-quality deck is an investment that can increase the overall value of your property, making it more attractive to buyers if you decide to sell.
A great return on investment: On average, homeowners can recover a significant portion of their deck investment when selling their home.
Incorporating a custom deck into your home’s design not only gives you a beautiful space to enjoy but also increases its marketability.
3. Durability and Longevity
Custom decks are built to last, as they are specifically constructed for your space and needs. Here’s why custom decks tend to be more durable:
Quality materials: You have the flexibility to choose from a wide range of materials, from low-maintenance composites to durable hardwoods, all designed to withstand the elements.
Expert craftsmanship: With a custom deck, you get attention to detail from skilled deck builders who know how to create a strong, long-lasting structure.
Built for your environment: A deck tailored for McCall’s climate ensures that it’s designed to endure local weather conditions, including snow and fluctuating temperatures.
A custom deck offers long-term durability, saving you from costly repairs or replacements in the future. Choosing experienced deck builders ensures your deck will stand the test of time.
4. Flexibility in Design Features
Custom decks provide flexibility in design that standard decks simply can’t. Whether you want to match your deck to the architectural style of your home or include special features, the possibilities are endless:
Multi-level decks: Perfect for sloped yards or creating different zones for entertainment and relaxation.
Built-in features: Add features like benches, planters, or fire pits for a truly custom experience.
Lighting and accessories: Choose from a variety of lighting options to make your deck functional and beautiful at night.
From custom shapes and sizes to unique features, a custom deck lets you design a space that fits your lifestyle perfectly.
Conclusion
A custom deck offers unmatched benefits, from a tailored design that suits your needs to increased home value and long-lasting durability. With Sunset Decks Idaho, our deck builders McCall ID can transform your outdoor space into a beautiful and functional area you’ll enjoy for years to come.
Ready to build your custom deck? Call Sunset Decks Idaho at (208) 739-6778 for a free consultation and estimate today!